It’s time to manifest your inexpensive drop cloth patio curtain ideas.
As in, it will take a few hours and you’ll be done!
Come on – no time like the present; stop putting off this satisfying and beautifying patio project.
Drop it like it’s hot, like it’s hot, oh so hot: DIY drop cloth patio curtains like a boss.
This has been the year of backyard DIY projects (HERE and HERE), but gaining some privacy on the patio has been one I have wanted to do for a few years.

Why install outdoor drop cloth curtains?
There are so many reasons to do this project. Maybe one of these is yours (I hope it’s NOT #4):
#1: Does the sun shine brightly on your patio, heating it to a hot fiery furnace in the afternoon?
This was a huge problem for us.
There was nothing to stop the sun from heating up the furniture, the concrete slab, and then our house.
So. Hot.
#2: Are the rays blinding in the morning while you squint and wish you had curtains?
~squinting~
I blame my crow’s feet on the squinting.
Don’t wait till you have them to act.
#3: Do you like sitting outside in yer jammies, enjoying your morning (or evening) brew, wishing you had privacy curtains, entertainmenting the neighbors with yer fashion choices?
As a gal who wears hobo cloths and pretends they’re jammies (the more torn and holey an outfit, the comfier, right?), there is no way I’m sitting on the patio unless I can be hidden behind my drop cloths o’glory!
#4: Or…do yu have a neighbor that is basically a peeping stalker because you have dragged your feet putting up any sort of privacy curtains for your patio?
Sensing a pattern here?
It’s time to do this thang, but not before a classic Oh, Mrs Tucker story.
A few years back, we had a neighbor whom I nicknamed Cletus. His creep factor from 1-10: 253.
Our yard sits a bit below his and he’d stand on his backyard patio and stare into our backyard patio, or worse, into our house.
I often let him know I didn’t appreciate his creepiness, Texas-style.
He always seemed to get the message, but soon enough I’d find him standing there, waving like we’d never had conversations about personal space.
BACK OFF, CLETUS!
We had several patio curtain ideas and decided to go with idea #1: plastic pull up shades.
We installed the very inexpensive pull up shades and were successful blocking us from him and him from us.
~jammie dance~
The shades where of the plastic variety, made for the outdoors, yet never lasted more than a year or two.
If it was windy, I had to hustle outside to roll them up, or they would bang against the patio supports and break.
The heat was also tough on them.
Texas summers can be brutal. The heat can warp, mangle and melt all sorts of things you wouldn’t expect (like shades that were made for the, oh, i don’t know…THE OUTSIDE).
When we took down the tattered shades last winter, I decided ENOUGH!
It was time for idea #2: We were bringing the indoors outside with outdoor patio curtains.
We were gonna get some drop cloths and have us a DIY session, OMT-style, IE the simplest way anyone could ever DIY outdoor curtains.
I picked drop cloths for a few reasons:
#1: Drop cloths are inexpensive. and can be replaced easily and without great expense.
#2: Drop cloths can be customized. Paint ’em. Dye ‘Em. Hem ‘Em.
#3: Drop cloths are versatile and perfect patio, balconey, deck or front porch curtains.
#4: Drop cloths are readily available at most home improvement stores (we have bought ours from both Home Depot and Lowes), year-round.
#5: Drop cloths are fun to use in unexpected places.
#6: Garry liked them. They weren’t fussy – they were tough. Husband approved!
Cletus has since moved (jiggity jig) and a family with itty-bitties has moved in: Oh, happy day!
Even though we are happy with the new neighbors (I have no idea how they feel about us), our yard still sits below theirs and well, they see us and we see them.
Just no getting around it, OMT likes her privacy, y’all.
Time to learn how to DIY drop curtains for YOUR space.
We started with two galvanized pipes as a curtain rod. It was considerably cheaper than traditional curtain rods and I liked the aesthetic. We thought about painting it, but I really dig the raw look.

We didn’t get one pipe, but two and used a connector. Easy peasy!
Garry did all the measuring and leveling, while I stayed below telling him how good looking he was on a ladder.
So good-looking, baby.
Truth.
We knew we’d have to install the pole on the outside of the beam, as opposed to underneath because of the metal supports.

He be a pro.
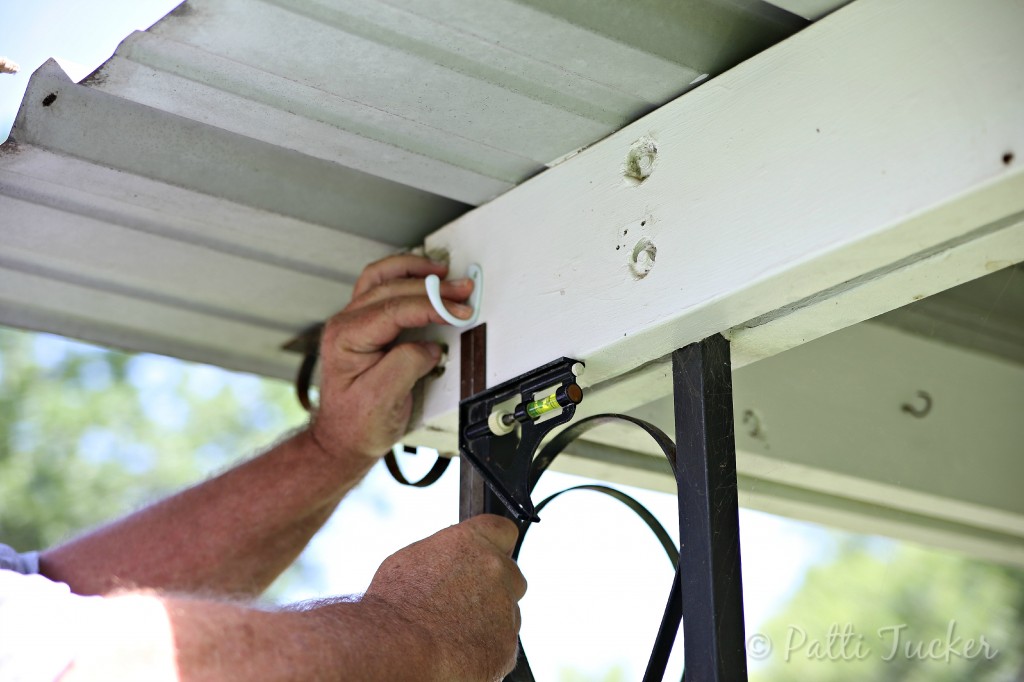
One thing that we realized after the job was done was that the rings that hold the drop cloths really don’t have the room to just hang and since we don’t want the paint to be worn thin along the line as we open and close the curtains, our solution will be to back each hook with a piece of wood.
You won’t see that in the pics, because we only realized it after we “finished” the project.
It’s on our to-do and I’ll update this post once we get ‘er done.
We’ll take each hook off, screw in a smaller piece of wood, then reattach the hook.
Here’s the hook as it is now:

We got the hooks up, then placed the pole. Bammo!

~ A gentle reminder: OMT! uses Amazon referral links at no cost to you.~
Wondering what size drop cloths we used?
We used three (very similar to these >) heavy duty 6 x 9 drop cloths, because:
#1: I don’t know how to sew a straight line and knew if we went too long, it would mean one more project that would never ever get done.
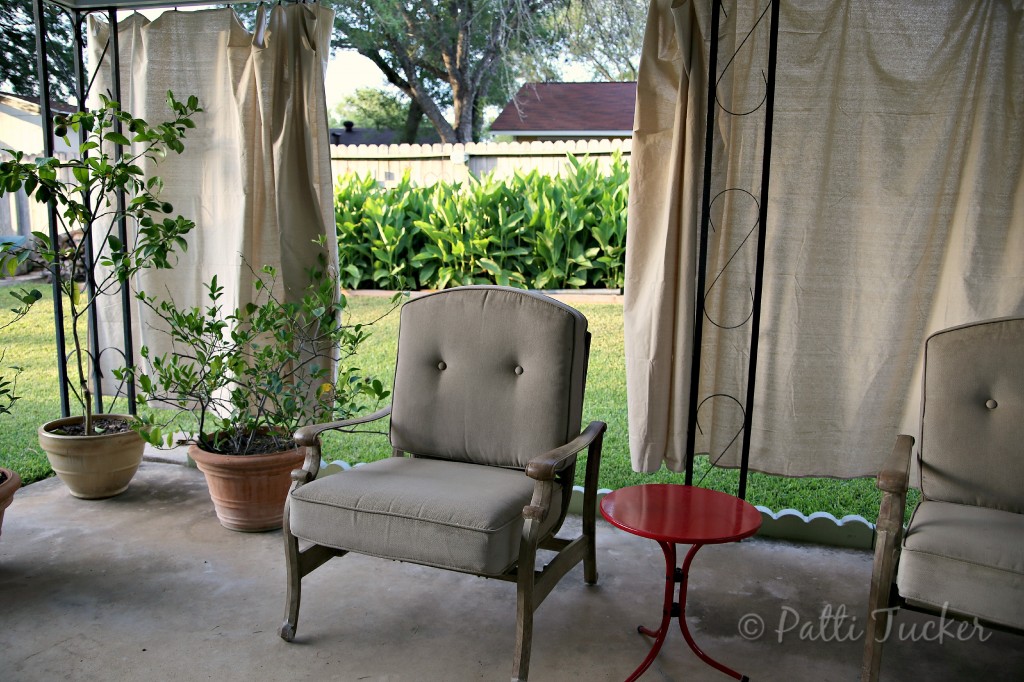
Turns out I like that the curtains don’t go all the way to the ground.
Seeing that bit of grass while sitting on the patio gives me a summer happy.
#2: Makes weed-eating easier for Garry.
#3: Heavy duty means they hold up longer to the elements.
Ours stay up all year long. Through the brutally hot Texas summers, through torrential spring downpours, through fall’s fickle hot then cold then hot then cold, and finally through winter’s whipping winds.
You can put ’em up and forget them.
Low maintenance is how I roll!
#4: If I’m happy, Garry’s happy, which in this case means everyone is happy!
We used simple curtain clips to attach the drop cloths.

I’m thinking I’d like to get one more package of the rings to even out the middle section, but overall they work great.
Garry thought the heavy duty drop cloths might be too heavy for the clips, but I haven’t witnessed any proof of that, especially since we’ve had a windy rain storm since and those curtains were flapping horizontally, yet remained in place.
Cletus would have been soooooo disappointed.
How many drop cloths do you need?
It will largely depend on the size of the space you are working with.
We used three drop cloths.
One on each end and then one for the middle section.
We’ll use tie-backs for all three sections during storms that are particularly brutal.
Other than that, the curtains slide open easily enough whenever I need to be seen!
Which is like never.
STOP LOOKING AT ME!
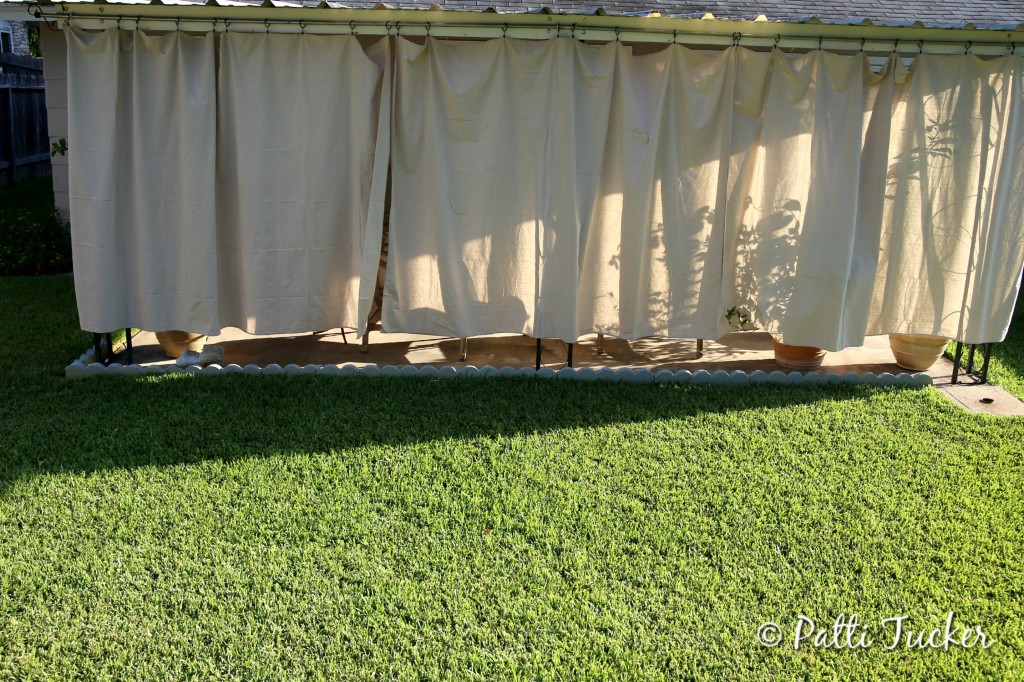
In this pic you can see the slope of our yard.
The neighbor’s patio is located behind the middle section.
If I had opened that one, you would have been able to see whomever was standing out there on their porch.
Here’s our view from the patio when the curtains are closed.
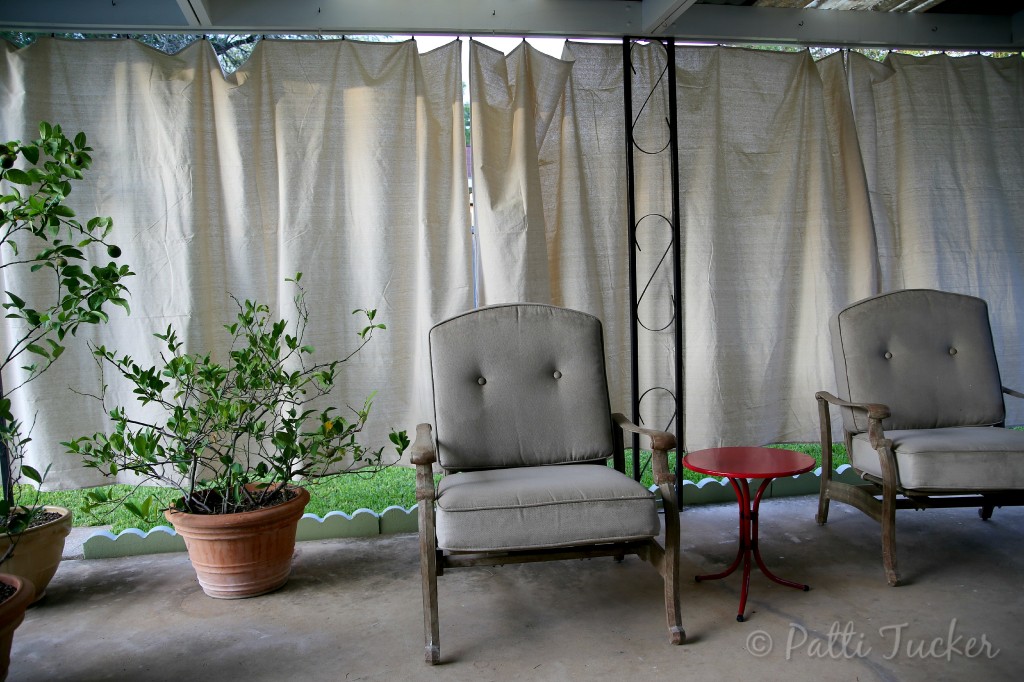
Private party, baby! We have bottle service for our VIPs, doncha know.
Here’s our neighbor’s view (I’m standing at the top of the slope, so you can get an idea of how easy it was to see onto our porch before the curtains went up):
While many of you might fancy-up the drop cloths, I’m loving them as is.
We have thought about letting Sweet E walk all over them with painted feet, but other than that, their natural-toned cottony simplicity speaks to my simple heart.
Even though we have a small modification to make in order to let the rings hang freely, it’s a DIY win, and more importantly, it’s a finished project!
Although, last year I considered dying a batch of new drop cloths for a refresh, yet never got around to doing it.
If I do, I’ll post updated pics.
You can use anything for a tieback for the curtains.
The cloths are easy to tie back if it’s windy or if you prefer a section or two open.
Even though it’s rare that I tie them back, I like having the option.
Alrighty – it’s your turn.
Go. Do. Celebrate in your hobo jammies!
Next on our DIY list?
One more garden bed.
Can’t wait.
Happy DIYing, y’all!
Originally posted July 23, 2014. Updated post: May 3, 2019